
photo credit: kennymatic via photopin cc
前回はAndroid端末による自作での「平均化フィルタ」によるぼかし処理を掲載しました。(だいぶ間開いてしまいましたね。)
「画像のぼかし処理」
今回はOpenCVを利用してのぼかし処理を実装してみました。
Index
- OpenCVによるぼかしの種類
- Gaussian Blurによるぼかし処理
- Median Blurによるぼかし処理
- Bilateral Filterによるぼかし処理
- Box Filterによるぼかし処理
- まとめ
OpenCVによるぼかしの種類
OpenCVでは「ぼかし」といっても以下のような種類があります。
- Gaussian Blur(ガウシアンフィルタを用いた平滑化)
- Median Blur(メディアンフィルタを用いた平滑化)
- Bilateral Filter(バイラテラルフィルタを用いた平滑化)
- Box Filter(ボックスフィルタを用いた平滑化)
それぞれどんな違いがあるのか?
計算式や手法を調べるよりも、今回の目的は自作でおこなった「ぼかし」しょりに近い画像になればよいので、実際に表示して判断することにしました。
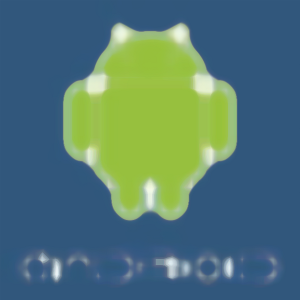
Gaussian Blurによるぼかし処理
Bitmap orgBmp = BitmapFactory.decodeResource(
        getResources(), R.drawable.ic_pic2);
Mat orgMat = new Mat();
Mat newMat = new Mat();
int strength = 41;

Utils.bitmapToMat(orgBmp, orgMat);  // (1)
Imgproc.GaussianBlur(
        orgMat, newMat, new Size(strength, strength), 0.0, 0.0);  // (2)
Utils.matToBitmap(newMat, orgBmp);  // (3)

ImageView img = (ImageView) findViewById(R.id.pic);
img.setImageBitmap(orgBmp);  // (4)
(1) – BitmapからOpenCVで処理するためのMat形式に変換します。
(2) – GaussianBlurでぼかし処理を行い、結果をnewMatへ格納します。
(3) – Mat形式からAndroidで処理するためのBitmap形式に変換します。
(4) – BitmapをImageViewへ描画します。
出力結果

処理時間:0.72s
Median Blurによるぼかし処理
Bitmap orgBmp = BitmapFactory.decodeResource(
        getResources(), R.drawable.ic_pic2);
Mat orgMat = new Mat();
Mat newMat = new Mat();
int strength = 41;

Utils.bitmapToMat(orgBmp, orgMat);
Imgproc.medianBlur(orgMat, newMat, strength);  // (1)

ImageView img = (ImageView) findViewById(R.id.pic);
img.setImageBitmap(orgBmp);
(1) – MedianBlurにてぼかし処理を行い、結果をnewMatへ格納します。
※その他処理は「GaussianBlur」と同じ
出力結果
処理時間:1.24s
Bilateral Filterによるぼかし処理
Bitmap orgBmp = BitmapFactory.decodeResource(
        getResources(), R.drawable.ic_pic2);
Mat orgMat = new Mat();
Mat newMat = new Mat();
int strength = 41;

Utils.bitmapToMat(orgBmp, orgMat);
Imgproc.cvtColor(orgMat, orgMat, Imgproc.COLOR_RGBA2BGR);     // (1)
Imgproc.bilateralFilter(orgMat, newMat, strength, 0.0, 0.0);  // (2)
Imgproc.cvtColor(newMat, newMat, Imgproc.COLOR_BGR2RGBA);     // (4)
Utils.matToBitmap(newMat, orgBmp);

ImageView img = (ImageView) findViewById(R.id.pic);
img.setImageBitmap(orgBmp);
(1) – Bilatera Filterで使用するためにRGBA形式からBGR形式に変換
(2) – Bilatera Filterによりぼかし処理を行う。
(3) – 処理した結果をRGBA形式に変換
出力結果

処理時間:14.95s
Box Filterによるぼかし処理
Bitmap orgBmp = BitmapFactory.decodeResource(
        getResources(), R.drawable.ic_pic2);
Mat orgMat = new Mat();
Mat newMat = new Mat();
int strength = 41;

Utils.bitmapToMat(orgBmp, orgMat);
Imgproc.boxFilter(
        orgMat, newMat, orgMat.depth(), new Size(strength, strength));  // (1)
Utils.matToBitmap(newMat, orgBmp);

ImageView img = (ImageView) findViewById(R.id.pic);
img.setImageBitmap(orgBmp);
(1) – BoxFilterにてぼかし処理を行い、結果をnewMatへ格納します。
出力結果

処理時間:0.11s
まとめ
ぼかし結果から見ると、「Gaussian Blur」「Box Filter」が自作で作成したぼかし画像に近いです。
また、処理時間も「Box Filter」だと自作の240倍という結果でした。
ここまでの結果がでると自作ロジックの性能改善をするよりも、OpenCVの利用で開発を進める事にします。


この記事のトラックバック用URL